


What is a Flow Builder?
A Flow Builder is a simple tool that lets you automate messages and actions by arranging steps visually instead of writing code.
You just choose blocks like “Send Message,” “Wait,” or “If User Replies” and connect them in order — like drawing a flowchart. Once set up, it works automatically, replying and guiding conversations for you even when you’re offline.
In simple words, it’s a way to teach a system what to do step-by-step when someone interacts with you online. For example, if a person sends a message, the Flow Builder can automatically reply, ask a question, wait for an answer, and then send the next message — all without you being there. It saves time and makes communication faster and more organized.
How Does a Flow Builder Work?
A Flow Builder works by following a step-by-step path that you create. You decide what should happen first, next, and after that — and the system simply follows your instructions automatically.
Here’s the basic working in simple terms:
- Trigger – Something starts the flow.
Example: A user sends a DM or comments a keyword. - First Action – The system sends an automatic reply.
Example: “Hi! Thanks for your message.” - Conditions (Optional) – The flow can check what the user does.
Example: If the user clicks a link → send next message. If not → send a reminder. - Follow-Ups – You can add delays and more messages.
Example: Send another message after 1 day. - End – The flow finishes after the goal is achieved, like collecting an email or sharing a link.
In short, you design the path once, and the Flow Builder runs it automatically every time someone interacts.
Why Flow Builder Stands Out
-
1. One Flow, Multiple Triggers
A single automation flow can be connected to different triggers such as post comments, story replies, or direct messages. This means you don’t need to recreate the same automation again and again — one well-designed flow can work everywhere. -
2. Reusable Automation Paths
Flows can be duplicated or reused for different campaigns. This saves setup time and ensures consistency in communication across posts and promotions. -
3. Cross-Interaction Automation
The same conversation logic can activate whether a user interacts through a reel, story, or keyword DM. This keeps the user experience uniform no matter where they engage. -
4. Flexible Entry Points
Users can enter the same flow from multiple starting points. For example, someone commenting on a post and someone replying to a story can both receive the same automated journey. -
5. Centralized Control
Instead of managing separate automations for each content type, everything can be controlled from one flow. Updating one flow automatically updates all connected triggers. -
6. Consistent Brand Messaging
Because the same flow is reused, your tone, offers, and replies remain consistent across all interaction channels.
Breaking Down each Node in Flow Builder
In a Flow Builder, nodes are the small blocks that make up the entire automation flow. Each node performs a specific action, and when you connect multiple nodes together, you create a complete automated conversation.
One of the biggest advantages of nodes is their flexibility. You can place nodes anywhere in the flow and use them whenever needed. There is no fixed order — you decide how the conversation should move.
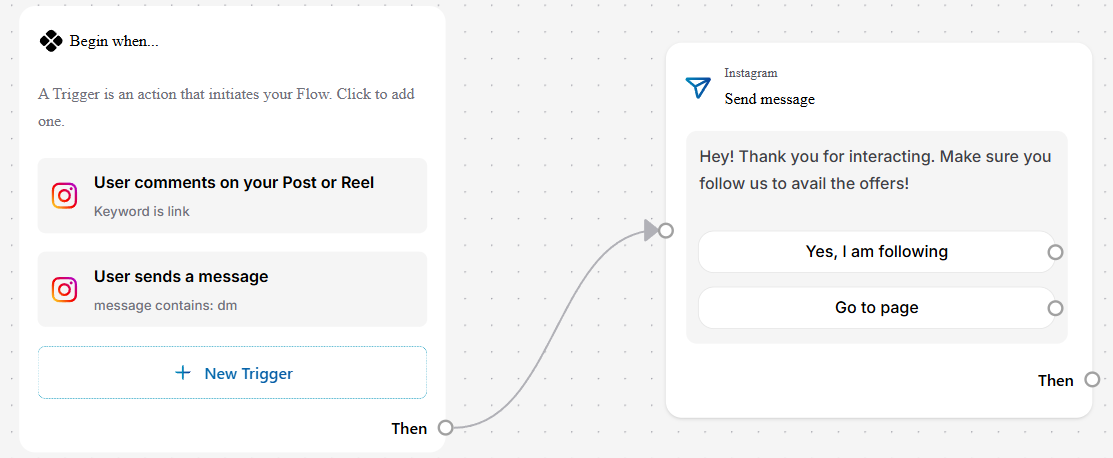
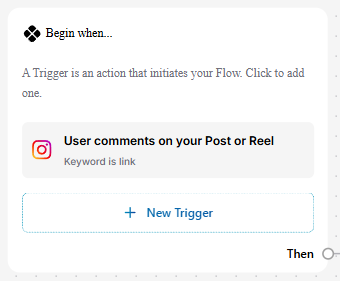
1. TRIGGER NODE
The Trigger Node is the starting point of any automation flow. Nothing happens until a trigger is set. It tells the system when to begin the conversation or action.
What the Trigger Node Does
The Trigger Node listens for user actions and activates the automation automatically. Instead of you manually replying, the system detects the action and responds instantly.
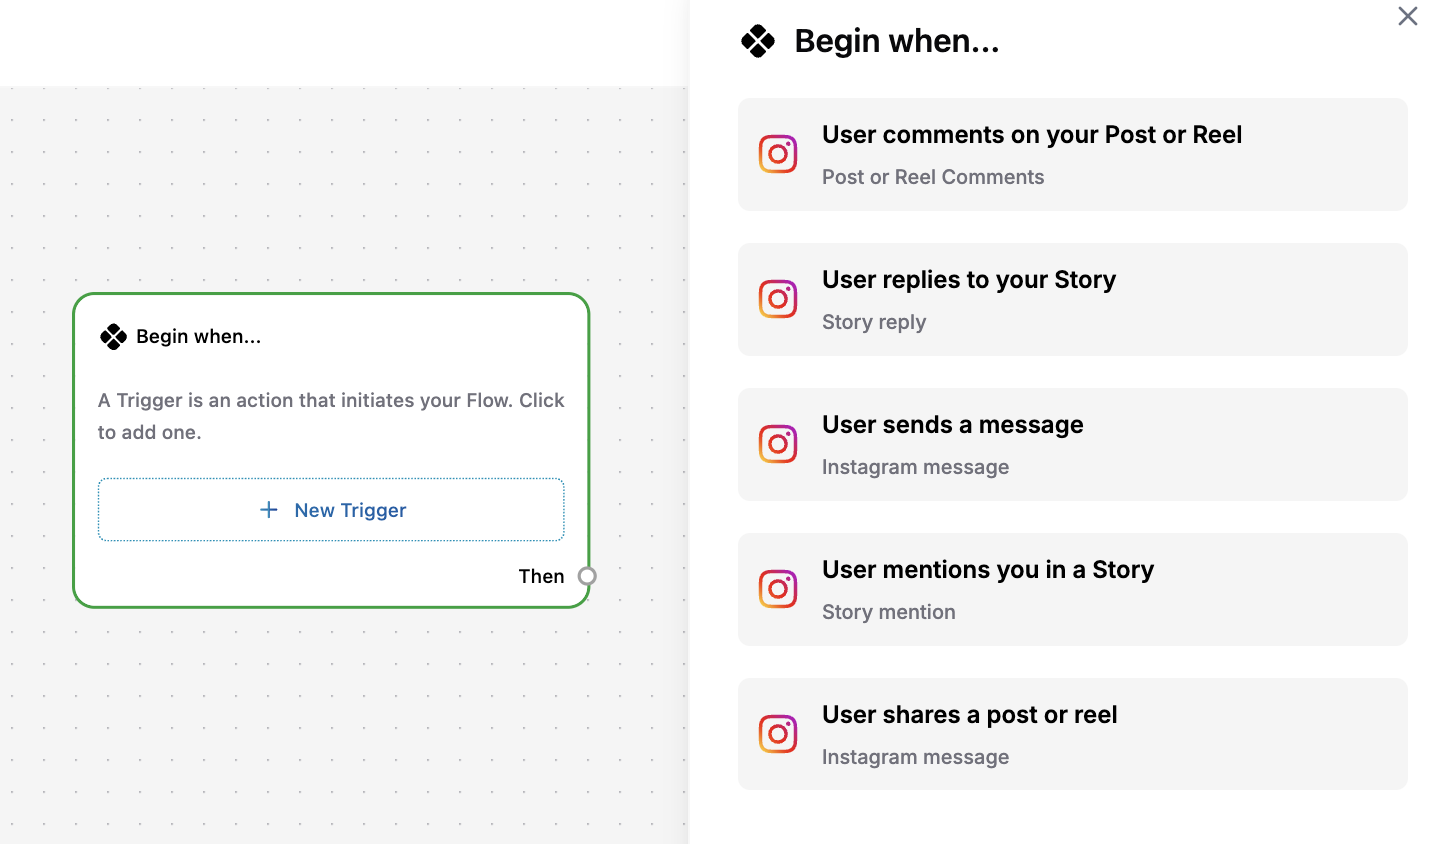
COMMON TRIGGER OPTIONS :
1. User Comments on Your Post or Reel
The flow starts when someone comments on your content. Useful for giveaways, offers, or sending links automatically.
Step 1 : Select the post you wish to automate
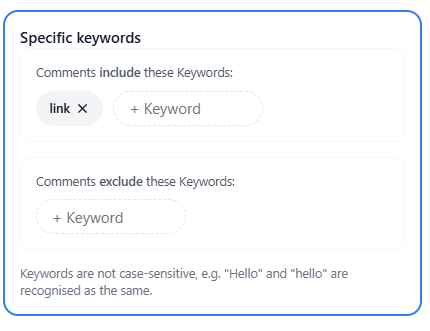
Step 2 : Add Specific Keywords
- Next, define the keywords that will trigger the automation.
- In the “Comments include these Keywords” field, enter the words users must type (for example: link, info, guide).
- You can also add excluded keywords if you want to prevent the flow from triggering on certain words.
- Keywords are not case-sensitive, so “Link” and “link” will be treated the same.
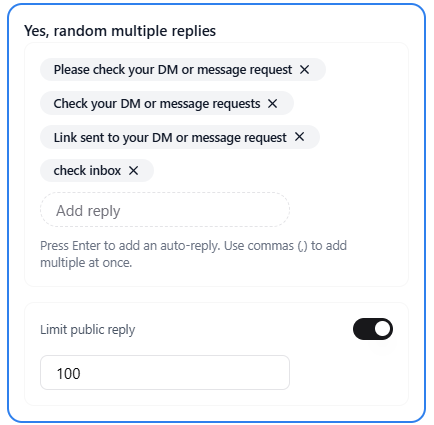
Step 3 : Set Up Public Reply (Optional)
- Here you can decide whether you want an automatic public reply under the user’s comment.
- Options Available: Add multiple reply variations (the system sends them randomly).
- Example replies:
“Please check your DM 📩”
“Link sent to your inbox!”
“Check your message requests.” - You can also:
Limit the number of public replies (for example, 100 per day).
Turn this feature off if you only want to send DMs. - This step increases visibility and lets users know to check their inbox.
Step 4 – Review Your Automation Trigger
Before finalizing, review all selected settings:
Post Selection – Confirms which post is automated.
Trigger Keywords – Shows the included keyword(s).
Auto Reply Status – Displays whether public replies are enabled.
Message Variations – Lists the responses that will be sent.
Step 5 – Save and Activate
Once reviewed, save the trigger. Your automation is now live and will automatically respond whenever someone comments with the chosen keyword.
2. User Replies to your story
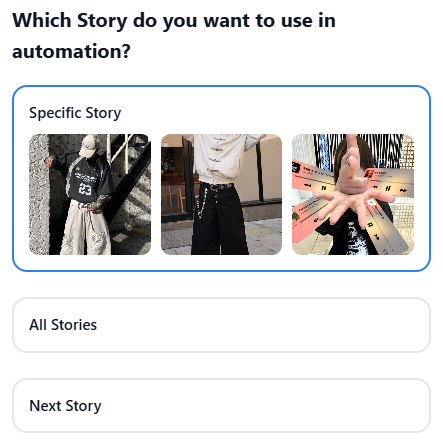
Step 1 – Choose the Story for Automation
First, select which story you want to automate.
You will see three options:
Specific Story – Choose a particular story from your account.
All Stories – Apply the automation to every story you post.
Next Story – Apply automation only to the upcoming story.
If you want full control, select Specific Story and pick the story where you expect user replies.
This ensures the automation runs only where intended.
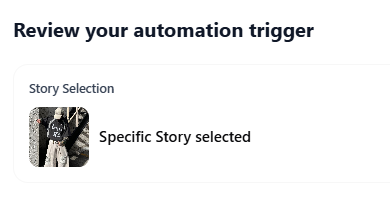
Step 2 – Review Your Automation Trigger
Before activating, review the setup carefully.
You will see:
Story Selection – Confirms which story is automated.
Trigger type – (User replies to story)
Auto reply status – Enabled or disabled.
Message variations – The replies that will be sent.
This step ensures there are no mistakes before going live.
Step 3 – Save and Activate
Once everything looks correct, save the trigger.
Now, whenever someone replies to the selected story, the Flow Builder will automatically start the automation you connected to it.
3. User Sends a Message
Step 1 – Choose What Starts the DM Automation
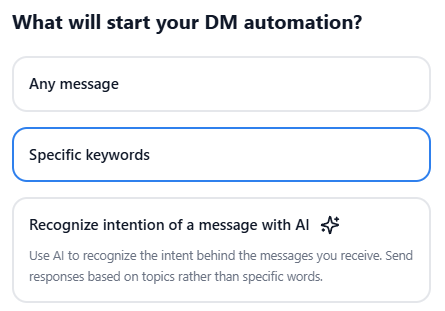
When selecting User Sends a Message, you’ll be asked:
“What will start your DM automation?”
You have three options:
-
1) Any Message
The flow will start whenever someone sends you any DM. This is useful for:
General welcome messages
Auto-responses
Customer support bots -
2) Specific Keywords (Most Common Option)
The flow starts only when a message contains certain words.
For example: “link”, “help”, “price”, “book”
This gives you more control and ensures automation only runs when relevant. -
3) Recognize Intention with AI
Instead of relying only on keywords, AI detects the intent of the message. For example, even if users type:
“Can you send me that?”
“I need more info”
“How do I get it?”
The system understands the intent and responds accordingly. This option makes automation smarter and more flexible.
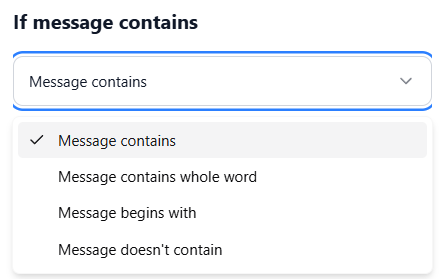
Step 2 – Set Message Conditions
If you choose Specific Keywords, you can define detailed message rules.
Condition Types Available:
Message contains
Message contains whole word
Message begins with
Message doesn't contain
You can combine multiple conditions to make the automation more accurate.
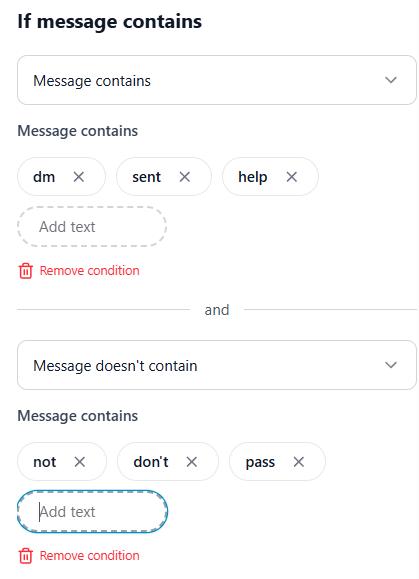
Example Setup
Condition 1: Message contains (dm, sent, help)
AND
Condition 2: Message doesn’t contain (not, don’t, pass)
This ensures the automation only triggers when the message is relevant and positive.
You can also:
Add multiple keywords
Remove conditions anytime
Combine conditions using AND logic
Keywords are not case-sensitive.
Step 3 – Review Your Automation Trigger
Before saving, review the configuration:
Trigger Type: User sends a message
Condition Type: (e.g., Message contains whole word)
Keywords Selected: (e.g., hey, send, link)
This review screen confirms everything is set correctly.
Step 4 – Save and Activate
Once saved, the automation will automatically trigger whenever a user sends a message that matches your defined conditions.
From here, the connected flow (Send Message, Delay, Conditions, etc.) will continue based on your design.
4. User Mentions you in a Story
Step 1 – Select the Trigger
Choose “User mentions you in a Story” as the trigger type.
This automation will activate automatically whenever someone tags or mentions your Instagram handle in their story.
There are no keyword or condition settings for this trigger — it works based purely on the mention action.
Step 2 – Review Your Automation Trigger
After selecting the trigger, you will see a review screen showing:
Trigger: Any story mention
This confirms that the automation will start whenever your account is mentioned in any story.
Step 3 – Connect the Flow
Once confirmed, connect this trigger to your desired flow nodes, such as:
Send Message (Thank you for mentioning us!)
Delay (Optional)
Condition (Optional follow-up logic)
Example use cases:
Automatically thank users for tagging you
Send a discount code
Request permission to repost
Share a collaboration message
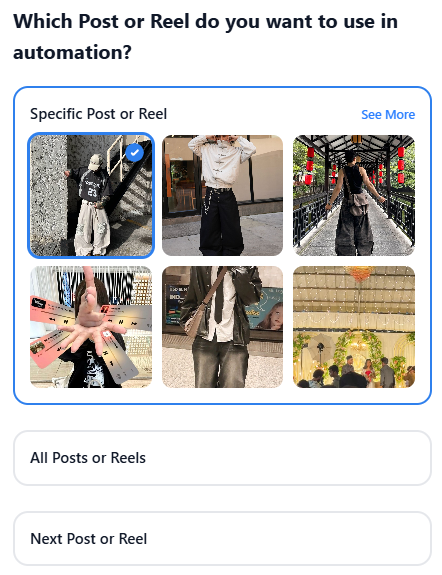
5. User Shares a Post or Reel
Step 1 – Choose the Post or Reel for Automation
After selecting “User shares a Post or Reel” as the trigger, you will be asked which content the automation should apply to.
- 1) Specific Post or Reel :
Select a particular post or reel from your profile. This is best when you want automation only on a single campaign, offer, or promotion. - 2) All Posts or Reels :
The automation will activate whenever any of your posts or reels are shared. Useful for general engagement or brand awareness campaigns. - 3) Next Post or Reel :
The automation will only apply to the next piece of content you upload. Helpful for time-limited promotions or launches.
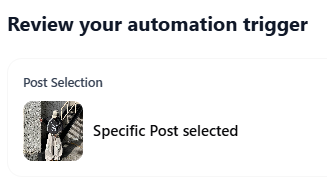
Step 2 – Review Your Automation Trigger
After selecting the content scope, you will be taken to a review screen.
Here you will see:
Post Selection – Confirms the chosen post or reel
Trigger Type – User shares a post or reel
This step allows you to double-check your settings before activating the automation.
Step 3 – Connect the Flow
Once confirmed, connect this trigger to the desired flow nodes such as:
Send Message – “Thanks for sharing our post!”
Delay – Optional pause before the next action
Condition – Optional follow-up logic
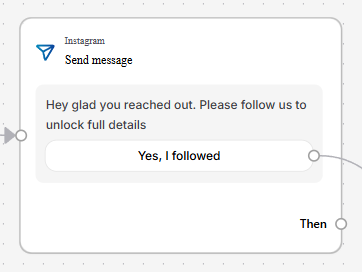
2. SEND MESSAGE NODE
The Send Message Node is used to automatically send messages to users during a flow. It is the most commonly used node because every automation needs communication.
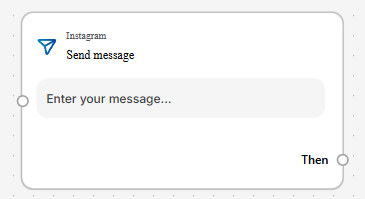
You can fully customize how your message appears by choosing different layout options and content blocks.
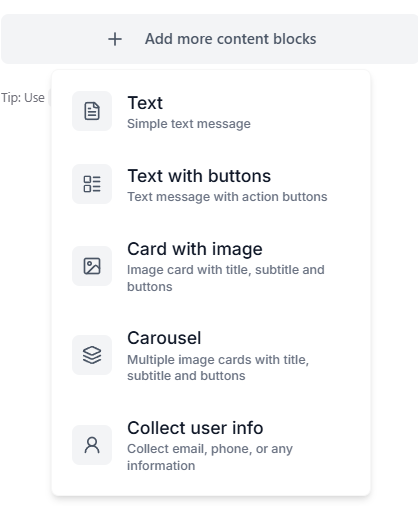
1) Simple Text Message
This is the most basic format.
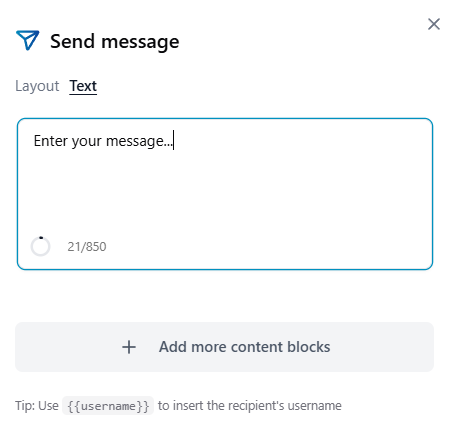
- You can:
Type your message directly
Personalize it using variables like {{username}}
Keep it short and clear - Best For:
Welcome messages
Quick replies
Simple confirmations
Example:
“Hi {{username}}! Thanks for reaching out.”
2) Text With Buttons
This layout allows you to add action buttons below your message.
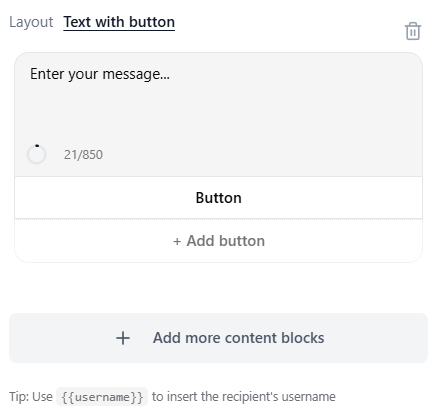
- You can:
Add one or multiple buttons
Edit each button’s title to customize the text
Guide users to the next step
Create structured replies instead of free text - Best For:
Choosing options (Yes / No)
Booking slots
Selecting products
Navigating flows
Redirecting users to a website
How to Edit a Button
-
Click on the “Button” block inside the Text with Buttons layout. The button settings panel will open.
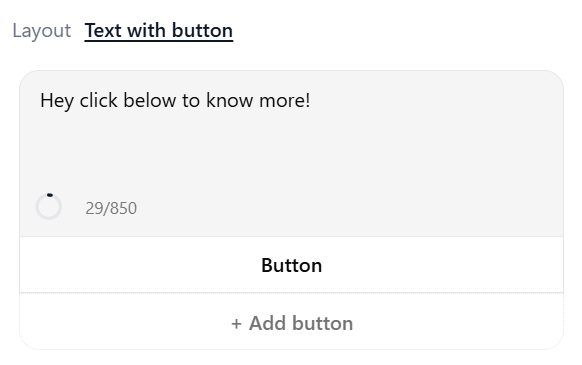
-
Edit the Button title to change the text displayed to users (for example, “Click Here” or “Book Now”).
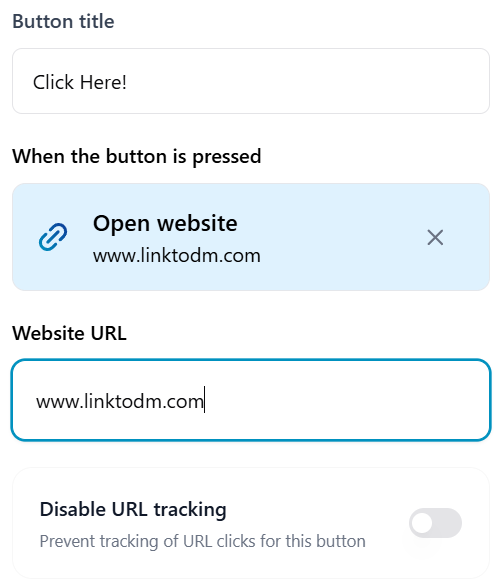
-
Under “When the button is pressed,” choose the action (e.g., Open Website). Enter the Website URL if required.
Click Done to save your changes.
Example 1:
Message: “Please choose a time slot.”
Buttons: Morning / Afternoon / Evening
Example 2:
Message: “Click below to know more!”
Button: Click Here → Opens website
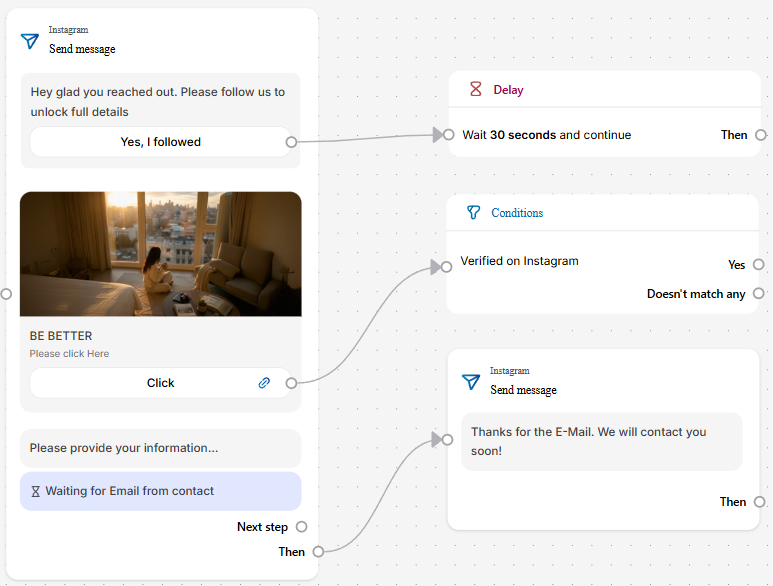
3) Card with Image
This format includes: An image, A title, A subtitle, and Buttons. It looks more professional and visually appealing.
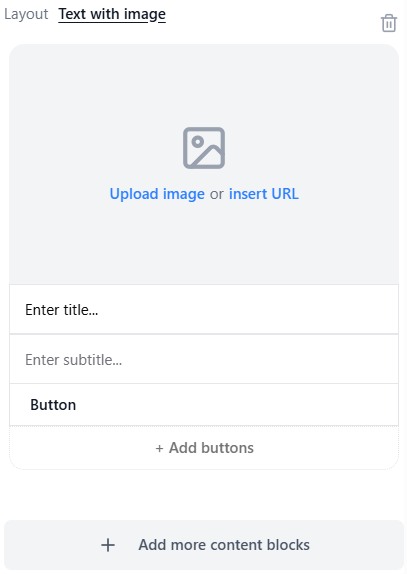
- You can:
Upload an image or insert a URL
Add a strong headline
Include call-to-action buttons - Best For:
Product promotions
Announcements
Highlighting offers
This makes the DM feel like a mini landing page.
How to Edit the Title
Click on the “Enter title…” field. Type your desired title text. (Example: “Limited Time Offer”). Press Enter or click outside the field to save.
The title should be short, clear, and attention-grabbing.
How to Edit the Subtitle
Click on the “Enter subtitle…” field. Add supporting information or description. (Example: “Get 20% off on your first purchase.”). Click outside the field to apply changes.
The subtitle is ideal for explaining details, benefits, or instructions.
Editing the Button
Click on the “Button” section inside the card. The button settings panel will open.
Edit the Button title (for example, “Shop Now,” “Learn More,” or “Book Now”).
Under “When the button is pressed,” select the desired action (such as Open Website). Enter the required URL if applicable. Click Done to save.
You can also add multiple buttons by clicking “+ Add buttons.”

4) Carousel
Carousel allows you to send multiple image cards in one message. Each card can include an Image, Title, Subtitle, and Buttons. You can add multiple items and let users swipe between them.
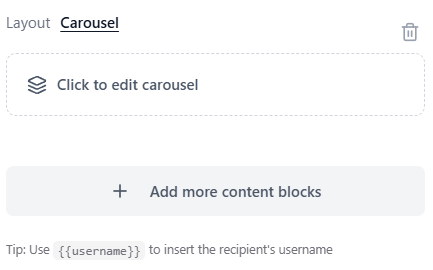
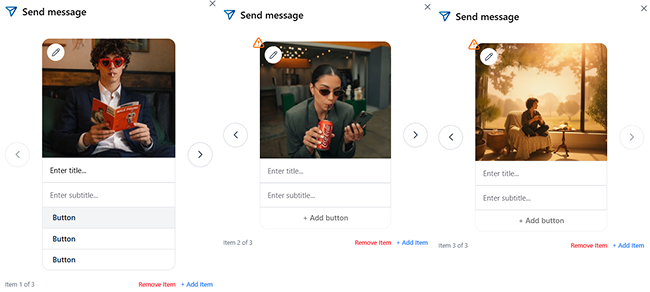
Best For: Showcasing multiple products, Displaying different packages, Presenting step-by-step content.
It’s powerful for ecommerce and marketing campaigns.
How to Edit the Button

5) Collect User Info
This block allows you to collect structured information like Email or Phone number.
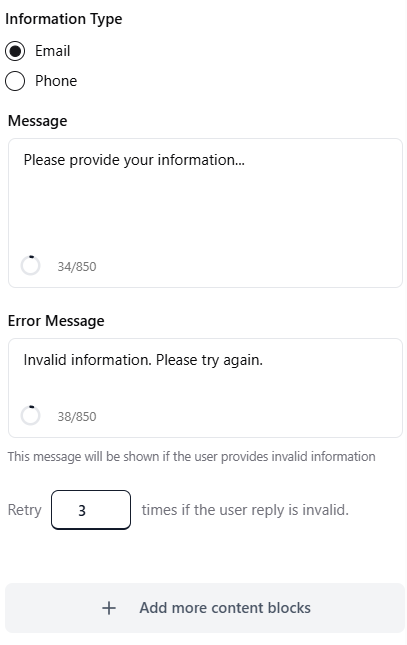
- You can:
Customize the request message
Add an error message
Set retry attempts
Example: “Please enter your email to receive the guide.”
If the user enters invalid information, the system will automatically show your custom error message and ask again.
Best For: Lead generation, Newsletter signup, Booking confirmations.
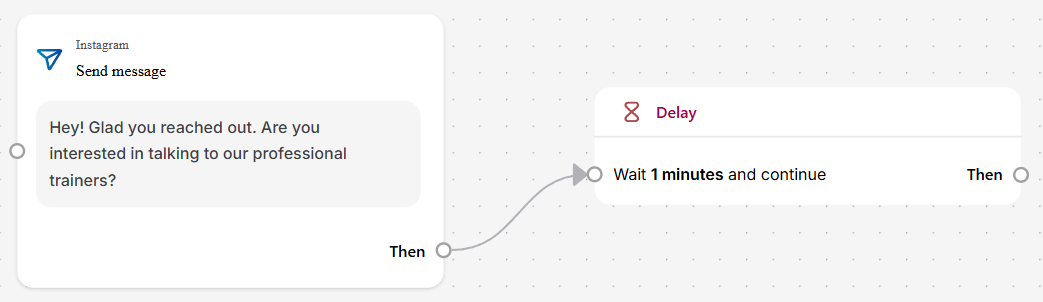
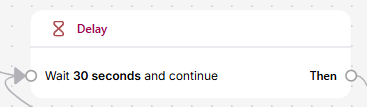
3. DELAY NODE
The Delay Node allows you to pause the flow for a specific period before continuing to the next step. Instead of sending all messages instantly, you can control when the next action should happen. This makes conversations feel more human and realistic.

How the Delay Node Works
The Delay Node controls timing in your automation workflow.
- It has:
One input connection
One output connection labeled “Then”
After the set duration (seconds, minutes, hours, or days), the flow continues to the next connected node.
When you add a Delay Node, you can set:
The duration
The time unit (Seconds, Minutes, Hours, Days)
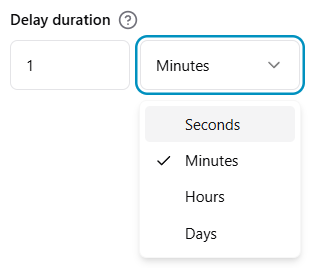
Example:
Wait 30 seconds before checking a condition
Wait 5 minutes before sending a reminder
Wait 1 day before a follow-up message
Once the time is completed, the flow automatically moves to the next connected node.
Note: Delay nodes cannot branch into multiple paths directly. They only pass control forward after the time is completed.
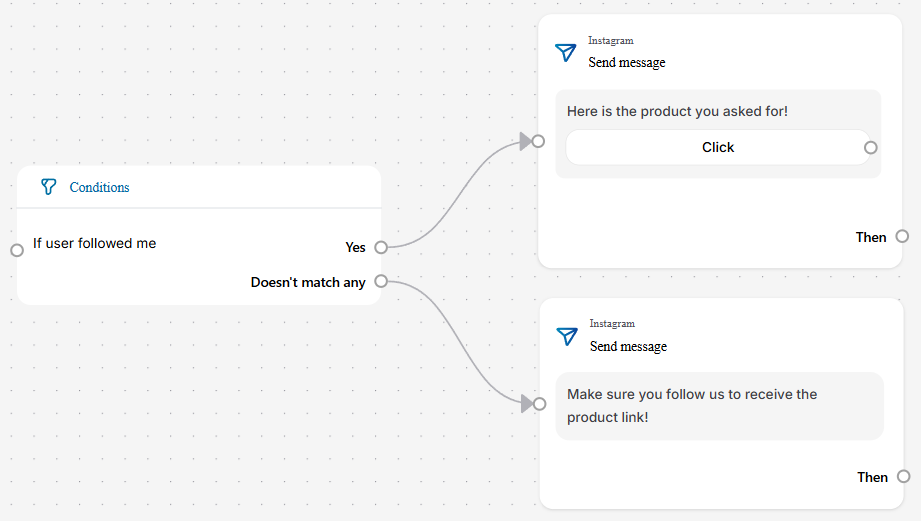
4. CONDITION NODE
The Condition Node allows your automation to make decisions based on user data or actions.
Instead of sending the same message to everyone, you can create different paths depending on specific conditions. Think of it like a “Yes or No” checkpoint inside your flow.
If the condition is met → The flow moves one way.
If not → It follows another path.
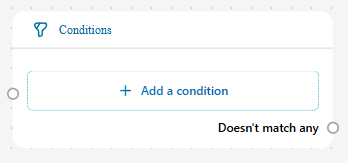
How the Condition Node Works
The Condition Node is the most advanced connection type. Unlike Trigger and Delay nodes, it can create multiple branches.
For each condition, you can: Assign a separate path Or use the default “Doesn’t match any” path.
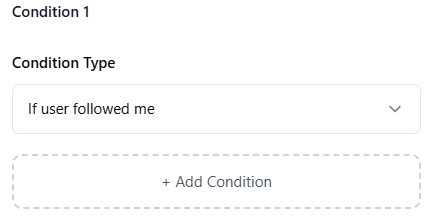
Example: Condition: “If user followed me”
Paths: Yes → Send reward message | Doesn’t match → Send follow reminder
When you add a Condition Node, you can choose from multiple condition types such as:
1) If User Followed Me
Checks whether the user is following your account.
Example: If followed → Send reward message | If not → Ask to follow first.
Perfect for “Follow to Unlock” flows.
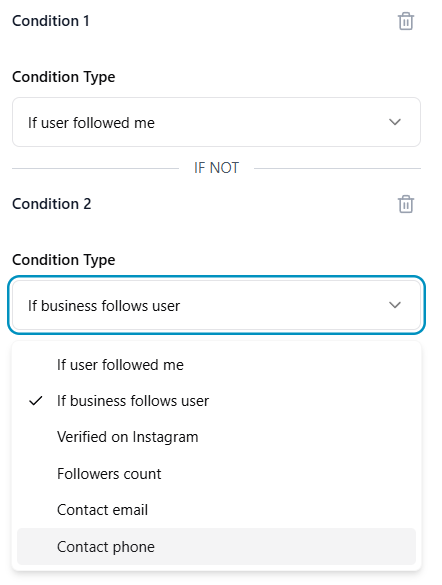
2) If Business Follows User
Checks if your account is following them back.
Useful for: VIP handling, Special audience treatment.
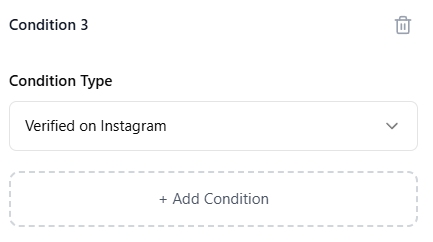
3) Verified on Instagram
Checks if the user has a verified badge.
Use case: Separate influencers from normal users, Prioritize collaboration requests.
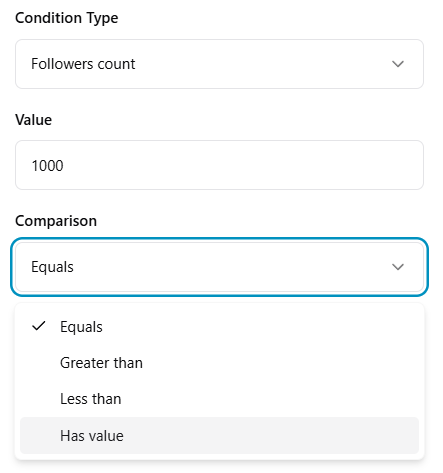
4) Followers Count Condition
You can filter users based on their follower count.
You must enter: A value (e.g., 1000) and a comparison type (Equals, Greater than, Less than, Has value).
Example: If followers count > 10,000 → Send collaboration offer. This is powerful for influencer marketing.
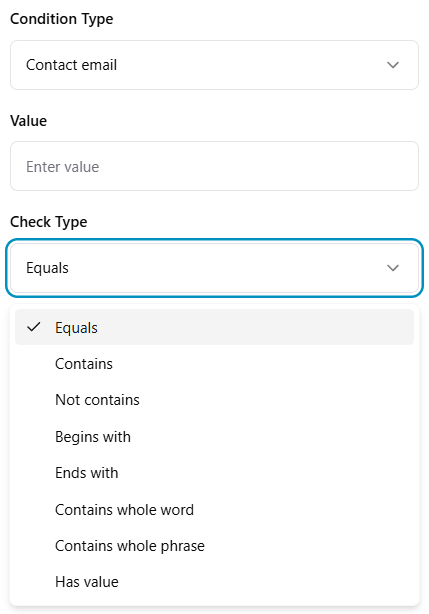
5) Contact Email Condition
This checks user-provided email information.
You can define: A specific value and a check type (Equals, Contains, Begins with, Ends with, Contains whole word, Has value).
Example: If email contains “@gmail.com” → Continue flow. Useful for lead verification and segmentation.
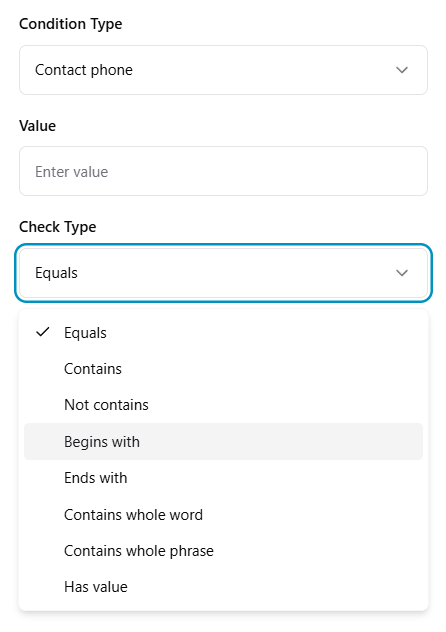
6) Contact Phone Condition
Works similarly to email conditions.
You can: Enter a value, Choose how the system checks it.
Example: If phone begins with +1 → Tag as US user. This is useful for geographic filtering.
Combining Multiple Conditions
You can add multiple conditions in the same node.
For example:
Condition 1: If user followed me
AND
Condition 2: Followers count > 1000
This creates more advanced logic and precise automation.
You can stack multiple conditions (e.g., If user followed me, If business follows user, If contact email equals @yahoo). Each condition can have its own path. OR You can use the single “Then” connection at the bottom to continue the flow regardless of which condition matched.
This makes the Condition Node extremely powerful for: Advanced segmentation, Influencer filtering, Lead qualification, Personalized automation flows.
Why Condition Node Is Important
- Personalizes user experience
- Creates multiple conversation paths
- Filters high-value users
- Makes automation intelligent
- Prevents sending irrelevant messages
In simple words, the Condition Node gives your automation a brain. It ensures that the right message reaches the right person at the right time.
How to Connect Nodes in Flow Builder
Connecting nodes is what turns individual blocks into a complete Instagram DM automation workflow.
In LinktoDM’s Flow Builder, every automation works like a path. Each node has connection points that determine what happens next. When you connect nodes properly, you create a fully functional automated DM flow.
Let’s break it down step by step.
Connecting the Trigger Node (Starting Point)
Every flow begins with a Trigger Node.
The Trigger Node has only one connection point labeled: “Then”
This means: A trigger can start only one primary path. It acts as the entry point of the automation.
How to Connect It: Click the small circle next to “Then.” Click the small circle on the node you want to connect it to. That’s it — the connection is created instantly.
Example: Trigger → Send Message. This creates the first step of your Instagram DM automation.
Connecting the Send Message Node
The Send Message Node is more flexible.
It can have: A main “Then” connection or Multiple connections if buttons are added.
Scenario A – Using “Then” (Simple Flow)
If you don’t use buttons, the node behaves like a straight path.
Example: Send Message → Delay, Send Message → Condition, Send Message → End (No further connection).
If you don’t connect anything after it, the Send Message node becomes the final step of your automation.
Scenario B – Multiple Paths from a Send Message Node
The Send Message Node does not only support different paths based on buttons. It can also create multiple automation paths based on different interaction elements inside the same message.
For example, in a single Send Message node, you can include:
A button (“Yes, I followed”), A link button (“Click”), A user information collection block (Email input) and more...
Each of these interaction points can lead to a different next step in your automation.
Message includes: Button: Yes, I followed, Button: Click, Email collection field.
You can connect:
Yes, I followed → Delay → Condition
Click → Condition (Verified on Instagram)
Email submitted → Send confirmation message
Each interaction becomes its own automation path. This creates a dynamic, multi-layered flow instead of a simple linear chatbot.
Connecting the Delay Node
(See details in the Delay Node section above).

Connecting the Condition Node (Decision Logic)
(See details in the Condition Node section above).
Multiple Conditions in One Node
(See details in the Combining Multiple Conditions section above).
What This Means for Your Automation
You are not limited to: Button A → Path A, Button B → Path B.
You can also build: Message content block → Path, Link click → Path, User data submission → Path.
This allows you to create advanced Instagram DM automation funnels like: Multi-step lead generation systems, Interactive product journeys, Follow-to-unlock campaigns, Influencer filtering flows, Smart email capture workflows.
Why This Is Powerful
This structure makes your Flow Builder: Interactive, Behavior-based, Action-driven, Highly customizable, Suitable for complex automation.
In simple words: A Send Message Node is not just a message — it can act like a mini decision hub where different user actions lead to different automation paths.
Important Best Practices When Connecting Nodes
- Always connect all required paths in Condition Nodes
- Avoid leaving floating (unconnected) nodes
- Keep your flow clean and readable
- Use Delay Nodes to avoid sending messages instantly
- Test your automation before activating
How Node Connections Improve Instagram DM Automation
Properly connected nodes allow you to: Build multi-step DM funnels, Automate lead generation, Create interactive chatbot experiences, Personalize responses based on user behavior, Scale conversations without manual effort.
In simple words: Connecting nodes is like drawing the roadmap of your automation. The connectors decide how the user moves through your Flow Builder. When done correctly, your automation becomes a smart, responsive, and scalable DM system.
Example: How the “Ask-to-Follow” Flow Works
To understand how a Flow Builder works in real life, let’s look at a simple Ask-to-Follow automation example. This type of flow is commonly used by creators and brands who want users to follow their account before receiving a link or special content.
Here’s how the process works step-by-step:
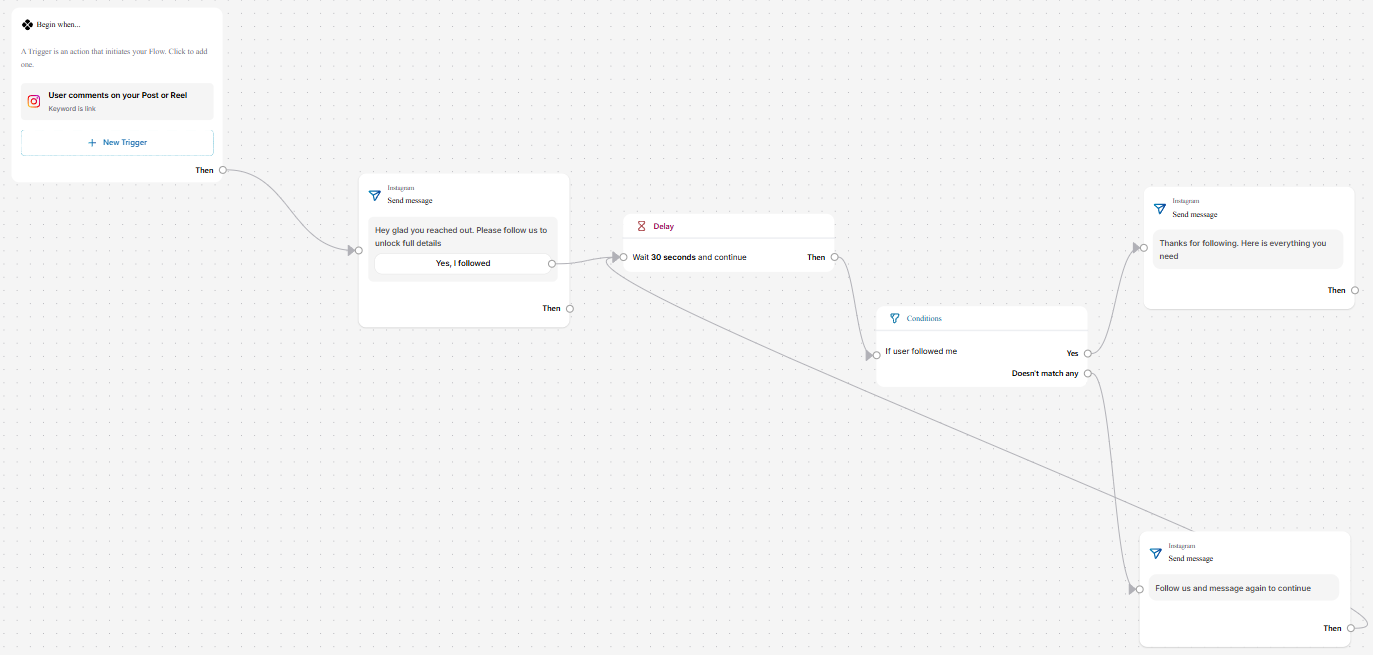
1. Trigger – User Interaction Starts the Flow
The flow begins when a user comments a specific keyword (for example, “Best Deal”) on a post or reel. This action automatically activates the automation.
2. First Message – Request to Follow
As soon as the trigger happens, the system sends a direct message asking the user to follow the account to unlock further details. This is the “Ask-to-Follow” step.
3. Delay – Short Waiting Time
The flow then waits for a few seconds. This small delay gives the user time to actually follow the account before the system checks their action.
4. Condition – Checking User Action
Now the Flow Builder checks whether the user followed the account or not.
If the user has followed, the flow moves forward.
If the user has not followed, it takes a different path.
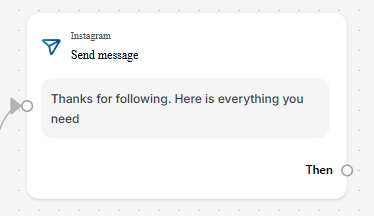
5. Result – Two Possible Outcomes
If Followed: The system sends a message like “Thanks for following! Here is everything you need.” This could include a link, PDF, discount code, or any valuable content.
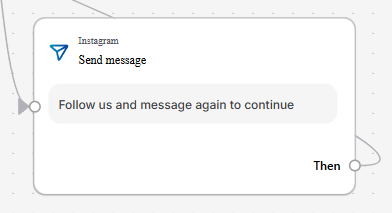
If Not Followed: The system sends a gentle reminder such as “Please follow and message again to continue.”
This entire process happens automatically without the creator manually replying. The Flow Builder simply follows the path that was designed, ensuring every user gets the correct response based on their action.
In short, the Ask-to-Follow flow acts like a smart assistant that checks user behavior and responds accordingly — saving time while increasing engagement and followers at the same time.
Benefits of Using Flow Builder
Using a Flow Builder offers several advantages for creators, businesses, and marketers who want to automate conversations and save time. Instead of manually replying to every message, the system handles interactions automatically and consistently.
- 1. Saves Time: Once a flow is created, it runs on its own. You don’t need to sit and reply to every comment or DM manually.
- 2. Works 24/7: Automation never sleeps. Even when you are offline or busy, the Flow Builder continues to respond to users instantly.
- 3. Increases Engagement: Quick and automatic replies keep users interested and active, which improves interaction rates on posts and messages.
- 4. Helps Grow Followers: Features like follow-to-unlock or keyword replies encourage users to follow your account before accessing content.
- 5. Improves Customer Experience: Users receive fast, structured, and helpful responses instead of waiting for hours. This builds trust and professionalism.
- 6. Scales Easily: Whether you receive 10 messages or 10,000, the Flow Builder handles all of them without extra effort.
- 7. No Coding Required: Everything is visual and drag-and-drop, making it accessible even for beginners with no technical background.

'%3e%3cpath%20d='M14.8156%200H1.18125C0.528125%200%200%200.515625%200%201.15313V14.8438C0%2015.4813%200.528125%2016%201.18125%2016H14.8156C15.4688%2016%2016%2015.4813%2016%2014.8469V1.15313C16%200.515625%2015.4688%200%2014.8156%200ZM4.74687%2013.6344H2.37188V5.99687H4.74687V13.6344ZM3.55938%204.95625C2.79688%204.95625%202.18125%204.34062%202.18125%203.58125C2.18125%202.82188%202.79688%202.20625%203.55938%202.20625C4.31875%202.20625%204.93437%202.82188%204.93437%203.58125C4.93437%204.3375%204.31875%204.95625%203.55938%204.95625ZM13.6344%2013.6344H11.2625V9.92188C11.2625%209.0375%2011.2469%207.89687%2010.0281%207.89687C8.79375%207.89687%208.60625%208.8625%208.60625%209.85938V13.6344H6.2375V5.99687H8.5125V7.04063H8.54375C8.85938%206.44063%209.63438%205.80625%2010.7875%205.80625C13.1906%205.80625%2013.6344%207.3875%2013.6344%209.44375V13.6344Z'%20fill='%23B1B1B1'/%3e%3c/g%3e%3cdefs%3e%3cclipPath%20id='clip0_6304_15414'%3e%3crect%20width='16'%20height='16'%20fill='white'/%3e%3c/clipPath%3e%3c/defs%3e%3c/svg%3e)

